

Depuis quelques semaines déjà on entendait parler de Hack sur PS4, c'est fait !!!!
PS4news met en ligne un guide dévoilant la méthode utilisée par le magasin brésilien pour dumper et copier le contenu d'une PS4 dans une autre.
Cette méthode engage énormément de matériel et des PS4 ne disposant pas du firmware 2.51.
Il faut obligatoirement un firmware en version 2.50 maximum, car Sony a corrigé la faille sur les version 2.51.
Préparez vous aux lignes de commandes, l'utilisation d'un Raspberry Pi.
Il faudra :
- chercher l'ID
- lire des données
- effacer des données
- enregistrer des données
- flasher et comparer des fichiers
Matériel nécessaire :
- Un Raspberry Pi
- Une carte mémoire de 4 GB
- PS4 1x Serial Flash MX25L25635FMI-10G
- Raspbian
- Win32 Disk Image
- Putty
- Documentation de AlphaHack pour connecter le Raspberry Pi PS4 NOR Chip
Installation
Installing Raspbian
Turn the win32diskimage
1 - In "Image file" select the image Raspbian that you downloaded.
2 - In "Device" select the drive that is your SD card.
3 - Click on "Write" to start the recording process.
After finishing the process, put the SD card into the Raspberry Pi and connect it using a USB cable.
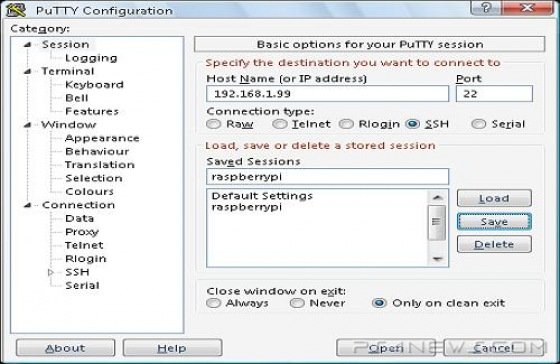
Remote Shell in Raspbian
Two minutes after starting the Raspberry Pi, turn the Putty.
1 - In the Host Name put: raspberrypi. If you do not work correctly, go to the settings of your router, and find the IP of the Raspberry Pi.
2 - Select SSH
3 - Select Open
Installing the application
He will request the login place "pi" to the user and "raspberry" for the password.
Note: For additional information about JaiCraB's developments, refer to JaiSpiMod: JaiSpiMod.hex for Teensy++ 2.0 PS4 Development by JaiCraB and JAISPI V1.0 Arrives, Read / Write PS4 MX25L25635 Memory by JaiCraB.
Enter the following commands:
sudo -s
cd / bin
wget http://jaicrab.org/P...s/JAISPI/jaispi
chmod + x jaispi
echo "#blacklist spi-bcm2708"> /etc/modprobe.d/raspi-blacklist.conf
echo "blacklist i2c-bcm2708" >> /etc/modprobe.d/raspi-blacklist.conf
reboot
Full installation. Place Putty to access the Raspberry Pi. To run the command jaispi you will have to ask root access (sudo -s)
# Sudo -s
# Jaispi -i / dev / spidev0.0
Options:
-i /dev/spidevX.X Get the flash ID
-r file.bin /dev/spidevX.X Read all the flash of a file
/dev/spidevX.X -e Deletes all flash
-p file.bin /dev/spidevX.X Records only the different blocks of a file
-v file.bin /dev/spidevX.X Check the blocks of a file
Get the ID: -i: Displays information about the flash.
#jaispi -i /dev/spidev0.0
JaiSpi v1.0
ID: 0xC22019 MX25L25635
Reading: -r: Makes a full dump of the flash (It takes about 35 sec)
#jaispi -r DUMP.bin /dev/spidev0.0
JaiSpi v1.0
ID: 0xC22019 MX25L25635
Reading ...
0x02000000
Done!
Delete: -e: Clean all the flash (It takes around 1min 30sec and)
#jaispi -and /dev/spidev0.0
JaiSpi v1.0
ID: 0xC22019 MX25L25635
Erasing blocks ...
Done!
Record: -p: Records in flash only the sectors with change (It takes around 1min 30sec and)
#jaispi -p Base.bin /dev/spidev0.0
JaiSpi v1.0
ID: 0xC22019 MX25L25635
Starting ...
0x02000000 -> 8192 written Sectors
Done!
Check: -v: Compares the flash content to file (It takes around 35seg)
#jaispi -v Base.bin /dev/spidev0.0
JaiSpi v1.0
ID: 0xC22019 MX25L25635
Checking ...
0x02000000 -> 0 Different sectors
Done!
A bientôt pour la suite